What is DMARC?
According to dmarc.org :
DMARC, which stands for “Domain-based Message Authentication, Reporting & Conformance”, is an email authentication, policy, and reporting protocol. It builds on the widely deployed SPF and DKIM protocols, adding linkage to the author (“From:”) domain name, published policies for recipient handling of authentication failures, and reporting from receivers to senders, to improve and monitor protection of the domain from fraudulent email.
DMARC is a policy with which the sender indicates the message is protected by DKIM and /or SPF. It also tells the receiver what to do with the message if DKIM/SPF authentication fails.
Please check the DMARC resources (from the end of this article) before creating a DMARC record. You can use an online tool to create a DMARC record. Check the DMARC Tools page.
To set a DMARC record for your domain:
- Log into cPanel
- Navigate to Zone Editor (DOMAINS section)
- On the row with the desired domain, click the Manage link
- Click the down arrow from the right of the Add Record button.
- Select Add DMARC Record from the drop-down list
- Modify any DMARC settings (see below) and click the Add Record button
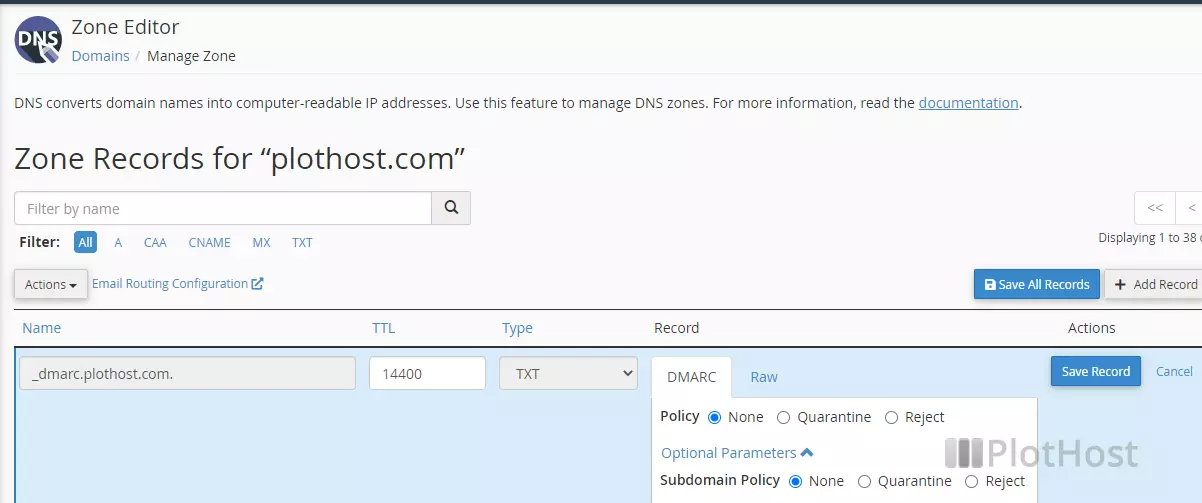
DMARC Settings
| Policy | Action |
| None | No action is taken; you can use this setting to monitor DMARC |
| Quarantine | Messages will be marked as spam |
| Reject | Messages will be rejected |
| Parameter | Settings |
| Subdomain Policy | Action for subdomain policy. Same options as for the main domain policy. |
| DKIM Mode | Relaxed – the system allows some messages from domains that it doesn’t recognize. Strict – the system will reject all messages from domains that it doesn’t recognize. |
| SPF Mode | Relaxed – the system allows some messages from senders that it doesn’t recognize. Strict – the system will reject all messages from senders that it doesn’t recognize. |
| Percentage | Default value is 100. It represents the percentage of the email messages you want the system to filter. |
| Generate Failure Reports When | All Checks Fail – report will be send if all checks fail Any Checks Fail – report will be send if any checks fail |
| Report Format | AFRF – Authentication Failure Reporting Format IODEF – Incident Object Description Exchange Format |
| Report Interval | The time in seconds between each aggregate email message report. The default value is 86400 (24 hours). |
The video tutorial for setting a DMARC record:
If you’ve added a valid email for the Send Aggregate Mail Reports To, you will receive a message from receivers that support DMARC, like in the example below:
From: noreply@dmarc.yahoo.com
To: admin@plothost.com
Subject: Report Domain: plothost.com Submitter: yahoo.com Report-ID: <1496110592.916792>
In the attachment you will see an XML file with the same name as the zip archive.<?xml version="1.0"?> <feedback> <report_metadata> <org_name>Yahoo! Inc.</org_name> <email>postmaster@dmarc.yahoo.com</email> <report_id>1496110592.916792</report_id> <date_range> <begin>1496016000</begin> <end>1496102399 </end> </date_range> </report_metadata> <policy_published> <domain>plothost.com</domain> <adkim>r</adkim> <aspf>r</aspf> <p>none</p> <pct>100</pct> </policy_published> <record> <row> <source_ip>d02.plothost.com</source_ip> <count>1</count> <policy_evaluated> <disposition>none</disposition> <dkim>fail</dkim> <spf>fail</spf> </policy_evaluated> </row> <identifiers> <header_from>plothost.com</header_from> </identifiers> <auth_results> <dkim> <domain>web.plothost.com</domain> <result>neutral</result> </dkim> <spf> <domain>web.plothost.com</domain> <result>none</result> </spf> </auth_results> </record> </feedback>
Resources:
DMARC Website at https://dmarc.org/overview/
DMARC Tools – record creation, lookup, check etc.
Google recommendations for DMARC here
cPanel Zone Editor Documentation